Go me!
I was able to get both of my new tutorials done tonight...
So here we have it! My last two tutorials with 3Ds Max!
Tutorial number FIVE
and Tutorial number SIX
I had a lot of fun working with 3Ds Max- I'm very happy I decided to stick with the one program for the entire tutorial lesson. It was a lot of learning and a lot of work, but very rewarding.
Sunday, December 4, 2011
Tutorial 6
As I thought, I had a change of heart for my sixth tutorial!
I figured working with particles, although fun, would not really follow along the path I had for working with animated tutorials.
SO! I found a really super-cool tutorial where objects even cameras can be animated along a path.
I know this can be done in Maya, but I've never tried it before.
I was mostly excited because it reminded me of animating symbols on a path in Flash... I love flash! Haha, so here is the tutorial I based my own tutorial on: TUTORIAL It was a lot of fun to try and hopefully my own tutorial comes out as fun!
6th Tutorial ideas
Tonight I will be working on my 5th tutorial (last week's misadventures prevented me from having it done on time) and thinking about my 6th.
For my 6th and final tutorial I liked the idea of working with particles.
I found this great tutorial on creating fire with particles seen HERE-- I'll see how that goes. If worse comes to worse, I'll just do another particle based tutorial, unless something more interesting pops up!
For my 6th and final tutorial I liked the idea of working with particles.
I found this great tutorial on creating fire with particles seen HERE-- I'll see how that goes. If worse comes to worse, I'll just do another particle based tutorial, unless something more interesting pops up!
Saturday, November 26, 2011
Thoughts for 5th tutorial
For my fifth tutorial I've been thinking I want to toy around with the curve editor to see how it effects animations.
I found a simple tutorial here that I'm interested in trying out for myself for my own tutorial.
I've been liking the idea of sticking to animation for my Max tutorials and this is a great way to really oomph-up your animation. It seems like a great tool to learn and I can't wait to get started!
I found a simple tutorial here that I'm interested in trying out for myself for my own tutorial.
I've been liking the idea of sticking to animation for my Max tutorials and this is a great way to really oomph-up your animation. It seems like a great tool to learn and I can't wait to get started!
Wednesday, November 16, 2011
Fourth Tutorial
Tuesday, November 15, 2011
Change in plans
As mentioned earlier I was thinking about modeling a character for my tutorials with the intent of rigging it for my 5th tutorial.
However, after watching more and more tutorials and trying it out myself, I came to realize modeling a character and rigging a character in 2 ten minute tutorials was unrealistic.
SO! I decided to dive further into fun animations you can do in 3Ds Max- this time I discovered a way to animate glowy effects on font (which would be useful for creating a logo or a movie opener... anything!)
This tutorial was fun but complicated, there were a lot of different windows and numbers to remember.
Worst part about it, is after I finished filming my tutorial, it was apparent that my video of the font effects didn't even show up for some reason! That was discouraging and weird that it would not show up- perhaps camstudio couldn't support it?
Either way I uploaded my obnoxious video created from the tutorial so it could be viewed!
ENJOY!
Sunday, November 13, 2011
For my next tutorial...
For the fourth tutorial with Autodesk 3Ds Max I want to model a character that I can rig for my fifth tutorial.
I anticipate this being a difficult task, but I'll do my best!
I found some great tutorials for rigging- one which is a 7 part tutorial.
You can find Part One HERE!
I just hope that it will not actually require over an hour to create my own rigging tutorial.
Hopefully with the simple model I intend to create for my fourth tutorial, the rigging for my fifth will be easy.
Fingers crossed!
Wednesday, October 26, 2011
Monday, October 24, 2011
Not gonna work
While I had the idea of having a biped stroll through some automatic doors... its not gonna work.
I tried for hours to figure out a way to make the Biped a "master" object (while animating in a basic walk cycle) that moves the "slave" object doors.
It did not work. I'm disappointed!
So, looks like I may doing something more basic... sigh.
I tried for hours to figure out a way to make the Biped a "master" object (while animating in a basic walk cycle) that moves the "slave" object doors.
It did not work. I'm disappointed!
So, looks like I may doing something more basic... sigh.
Third tutorial idea
After watching the video tutorial HERE I like the idea of working with the reaction manager in 3Ds Max.
In this tutorial the user creates an automatic sliding door effect by sliding a teapot.
As the teapot moves close to the doors, the doors open and let the teapot slide through. After the teapot has passed through the doors, the doors close behind it.
I really like the idea of trying out this sliding door with the reaction manager.
Instead of using a teapot, however, I would like to try using a walking biped.
If all goes to plan, the biped will trigger the doors to open when it walks close to the doors. Not just when it is slid towards the doors, as it was with the teapot.
I plan to test this out now and I'll report how it goes!
Fingers crossed!
Monday, October 17, 2011
3Ds Max Animating abilities
While I have not completely decided whether or not I will do all 6 of my tutorials with 3Ds Max, I figure I should look up different tutorials I could do with this program. Just in case.
With my background in animation, I would really like to stick to animation-based tutorials.
I did some research and found some interesting possibilities for future tutorials:
I may look into working with the Reaction Manager- which is the tool that a classmate showed in his last tutorial (where he had a fridge door swing open and knock down a stack of boxes).
If not the reaction manager, I may work with rigging my own simple model.
My third option is to work with particle effects and animations, as 3Ds Max seems to have a wide variety of effects it can create with simple particle manipulation.
With my findings, I am feeling fairly convinced that I may just continue working the rest of my 4 tutorials with 3Ds Max.
But who knows? Maybe I'll find some more interesting things I can do with the 3D software Messiah!
Wednesday, October 12, 2011
Tutorial 2
For my second 3Ds Max tutorial I covered some basic information on how the timeline works and how to animate with the biped skeleton.
It was great to go back to my animation routes and make things move- however, I am a little rusty with 3D animation. Definitely something I want to focus on more.
I didn't want to get ahead of myself and demonstrate something too intense, but hope my next animation tutorial will have much more to show.
The tutorial will be posted soon!
Monday, October 3, 2011
Planning tutorial 2
With my first 3Ds Max tutorial complete I am now contemplating what I will cover in my second!
I have decided that, instead of working with three separate 3D programs, I will be focusing my attention on 3Ds Max and perhaps Messiah.
I understand what in choosing to create tutorials for 1 or 2 programs, as opposed to three, my tutorials will need to be more advanced. So I will be looking into that further.
For the time being, I believe I will work with the Biped character more.
I intend to demonstrate in our next tutorial how one can tweak the already programmed walk/run and jump cycles to make it different/your own.
This week I will also be looking into Messiah a bit, to see what this software has to offer!
Wednesday, September 28, 2011
Tutorial
I just created my first 3Ds Max tutorial!
I focused on the basics and then moved onto talking about the biped-- the biped is a lot of fun! I can't wait to work with it more.
Unfortunately though, making this tutorial was a pain. I had to do it over 6 times because the screen capture software I downloaded was acting up... that and I kept forgetting my script and ques...
I'm currently uploading the video tutorial to youtube, then I'll post it here!
Monday, September 26, 2011
Biped
Over the weekend Nick helped me understand more about 3Ds Max.
As I mentioned earlier, as an animator for the DND he uses Max daily!
He showed me how to use the biped, a feature he often works with.
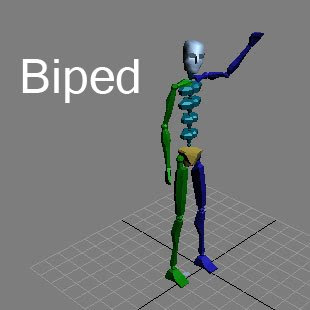
The biped is a human skeleton that you can rig a humanoid model to and animate. It makes the rigging process easier as you don't have my make your own skeleton and worry about making sure it moves properly- its already created to do so!
I especially like the biped because this feature does not exist in Autodesk Maya (as far as I know). It make things simple!
Either for my first tutorial or my second, I will work with the biped and show many of the neat things it can do!
Thursday, September 22, 2011
Playing Around
So today I began to really play around with 3D Studio Max.
Having been trained in Maya I was a little confused with the controls and layout for this software, so I sought out a beginner's tutorial for Max.
I found a 4 part tutorial by Aaraon F. Ross, under the youtube alias of DigitalArtsGuild. I found the tutorial very helpful. It was fairly slow paced and it talked about the most basic of basic controls, which wasn't really necessary for me, but it was appreciated none the less.
Find the DigitalArtsGuild tutorial HERE
Part 1/4 went over the interface, object creation and the transform tools.
Part 2/4 focused on viewport navigation and hotkeys.
Part 3/4 discussed display options, viewport configuration and object properties.
Lastly part 4/4 explained the snap to grid option, modifiers and the free form deformer tool.
In part 4/4 while going over the free form deformer tool, the tutor showed how to use the tool by creating a very basic icecream cone. I decided to follow along and make my own icecream cone, too!
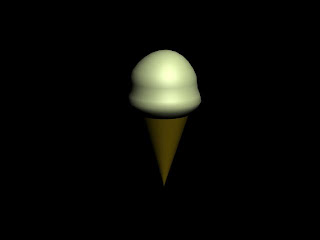
Doesn't it look... delicious...?
With the basic understand of how to use/navigate 3Ds Max I am going to start watching more advanced tutorials.
I would like to have a better idea how to model so I can create my own model for the first tutorial, a week from now.
I think I will focus on animation for my second tutorial... or maybe I'll switch it up?
We'll see!
Friday, September 16, 2011
The Adventure Begins!
So my adventure into the class; 3D Exploration Software, begins!
The purpose of this class is to try out different 3D programs so my classmates and I graduate as well rounded, well educated, hard little workers!
We are to chose 3 different 3D programs to play around with. I decided to try out the following:
1. Autodesk 3ds Max
2. Messiah
3. Zbrush
I am very excited to try each of these 3D programs and test out what each of them has to offer.
As we speak I am installing a student edition of 3ds Max, which I will be working with for the next month. During this month I will be creating two video tutorials showcasing my learning.
My boyfriend, and fellow NSCC alumni, Nick Macdonald is an intern at the DND. As part of his job, he works closely with 3ds Max and often tells me of its advantages over Autodesk Maya, the 3D program I am most familiar with.
I look forward to the learning I have ahead and hope everything goes fairly smoothly!
Subscribe to:
Posts (Atom)